One effective way to deepen and maintain a long-term relationship with a customer is to personally wish them a happy birthday, name day, holiday, or other anniversary. Boldem can automatically send all your anniversary and holiday messages on your behalf, including a personalized greeting.
Automation goal
The purpose of anniversary automation is to automatically send personalized greetings to customers who are celebrating a name day, birthday, or another anniversary for which you track a date. For name days you don’t need to record anything for Czech and Slovak customers — Boldem will automatically determine the date from the first name; you only need to set it up correctly.
The automation has only two or three steps, during which a congratulatory message is sent to the recipient. Optionally, you can flag recipients who received the email for later reference. You can also automatically send promo codes to recipients in the emails.
Prerequisites
To create an anniversary automation, you’ll need:
- Activated E-mailing plan in the Boldem account.
- A fully verified sending domain.
- The mailing list from which to import recipients into the automation.
- For name-day purposes, each recipient must have an assigned first name so Boldem can correctly determine the recipient’s name day (applies to Czech and Slovak first names).
- For the birthday anniversary automation to function properly, the recipient must have a custom field with a date of birth or another anniversary date (e.g., registration anniversary).
- Transactional template — the message you want to send to recipients.
- An online store or other type of website integrated with a Boldem account (optional).
- Promo codes (optional) – if you decide to offer promo codes to customers as part of automation, you need to add them first.
Find details for each step in the chapters below.
Website/online store integration with a Boldem account
If you don’t run an e-shop or a website through which you collect recipients, and you don’t need the anniversary automation to check whether recipients made purchases in your store, you can skip this step. Otherwise, it’s practical to integrate your website with Boldem not just for this automation.
To ensure Boldem correctly imports data from your website (online store or other system) and that you can effectively use features like automations or subscription forms, you must first integrate your website with your Boldem account. You have these integration options:
- A general integration that lets you display a form on your website to collect data.
- Instant integration of your online store with the Shoptet or Upgates platform, enabling seamless synchronization of your contacts database, shopping cart data, and orders.
- Advanced integration of any website or online store on any platform that, besides displaying the form, can also sync contacts or order/cart details. However, this integration requires a developer to implement it to your specifications.
For full functionality of the integration, a Boldem account with the E-mailing plan or higher is required. You can change your plan at any time via the Billing menu. If you encounter problems when upgrading your plan, contact your salesperson or our customer support by email, phone, or chat.
Below are instructions on how to integrate various platforms with your Boldem account:
- Shoptet store integration with your Boldem account.
- Integration of an Upgates store with a Boldem account.
- Integration of the Rocketoo store with a Boldem account.
- Integration of any website with the Boldem app.
Mailing list
For the automation to work correctly, you need a mailing list from which recipients will be loaded into the automation.
You can easily import recipients into your mailing list. Find instructions for importing recipients here.
For anniversary automations to work correctly, recipients must have a first name assigned and, if applicable, a date in a separate custom field (birthday, registration, etc.).
Transactional template
In automations, only so‑called transactional templates can be used. Any smart template can be set as a transactional template. A fully verified sending domain is required for a transactional template to work properly. You can manage your sending domain in Settings/Domains.
To create a new transactional template, follow these steps. You can update an existing smart template the same way; in that case, open the template and continue with step 4:
- Log in to the Boldem app and go to the Templates section.
- Click Create new template and select Create smart template.
- Choose whether to edit a predefined template from the gallery, use a sample template, or start from scratch with an empty template.
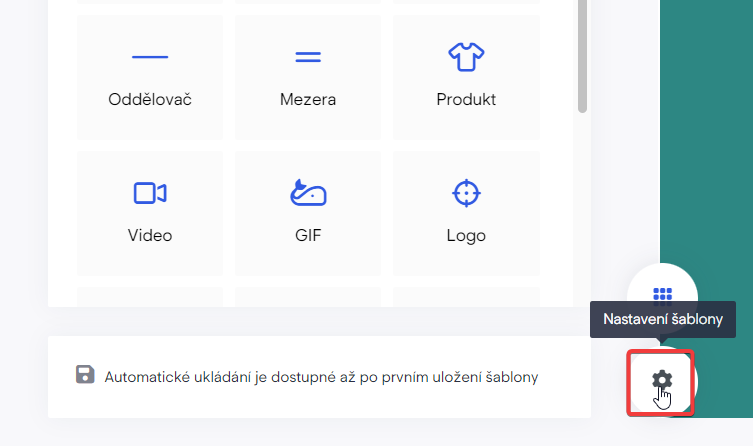
- Click the gear icon. The Information tab will appear.
- On the Information tab, enter the template name, subject, and preheader (subject preview).
We recommend naming the template after the context or scenario you’ll use it in automations, so you can easily find it in the template list.
- Enable transactional features with the toggle switch Template for transactional emails (Automation and API). Additional fields for the transactional template will appear.
- Fill in Sender Email, Sender Name, and select Domain Router from the dropdown list.
Enter a working sender email address. This email must be on a domain you have verified in Boldem. Add or verify a domain in Settings/Domains.
- In the top-right corner, click Done and select Save and Exit.
Promo codes
If you decide to give your customers a discount as part of the anniversary automation, it’s practical to use a separate promo code for each customer. Before using promo codes in the template, you need to add them to the system — either manually or by importing them from a file:
- Go to Settings/Promo codes.
- Click All groups and select Add group.
- Enter a group name, choose its color, and confirm by clicking the Add button.
- Click on New promo code.
- In the drop-down menu Expiry date settings, select the type of validity for the promo codes. It should match the validity set in the online store from which you generate the promo codes.
- No time limit – all imported promo codes can be used without expiration.
- Common – all imported promo codes share a single expiration date and time. Once selected, a field will appear to enter the common expiration date.
- Individual – each imported promo code has a defined expiration date and time. In this case you must have two custom fields in the imported file: one for promo codes and the other for the expiration date (or date and time).
- If you have a file of promo codes to import, click Select file and confirm your choice by clicking Create.
The file with promo codes must be in Excel, CSV, or TXT format, with promo codes stored one per row. Optionally, the imported file can contain the promo code expiry date in the second column in the date format you use in your account (see Settings/General/Basic settings – Date & time format), or in the default English format mm/dd/yyyy. The expiry date will be applied only if you selected Individual for Expiry date.
- You can also import a small number of promo codes manually by entering them into the Promo codes field. In that case, enter one promo code per row. To add an expiry date to manually entered promo codes, select Expiry date settings → Individual in the drop-down menu and append a semicolon or vertical bar to the promo code name, followed by the date and time in the format set in your account (see note above), e.g.:
CouponCode11;29.3.2028 11:38

CouponCode12|29.3.2028 12:00- Confirm the dialog by clicking Create.
Using a promo code in a template
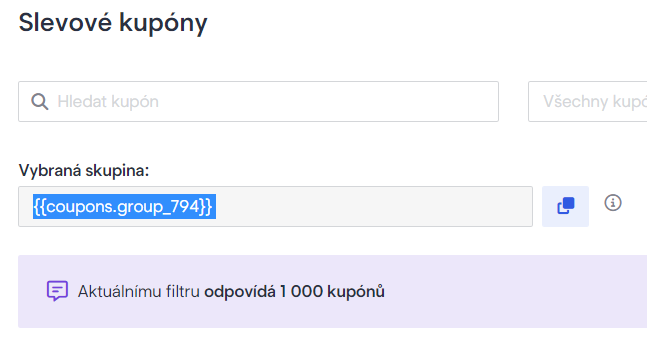
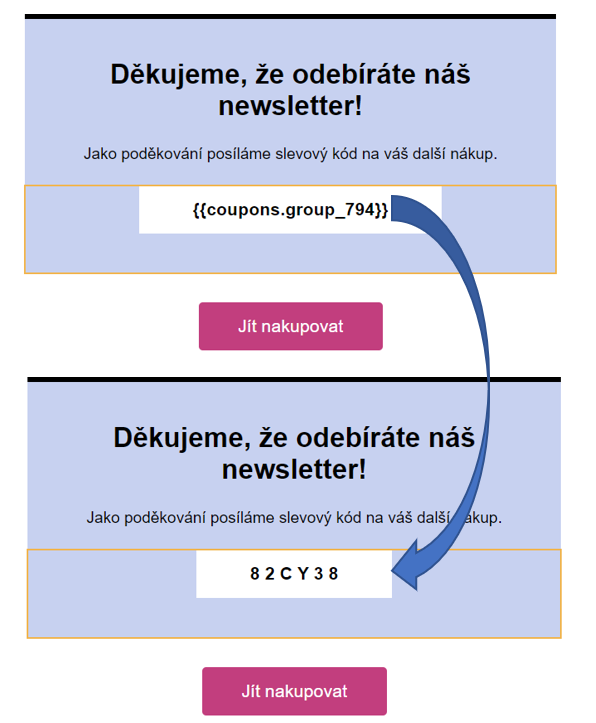
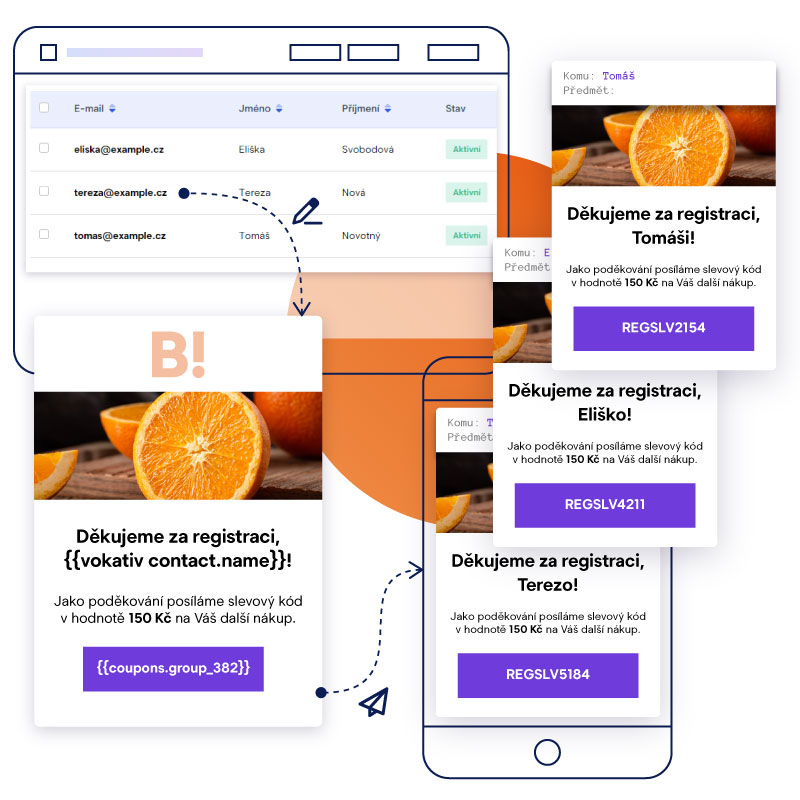
You can organize promo codes into groups that can be assigned different colors and names. Each group has a unique identifier, e.g. {{coupons.group_794}}. Copy it and paste it into the templates you plan to use in campaigns or automations.
In the template, paste the copied promo codes group identifier where you want unique promo codes to appear to recipients after the campaign is dispatched or after starting an automation and sending transactional emails.
Personalized greeting in the template
When creating a template you’ll send to customers, always consider how its opening—your greeting—will come across to your recipients. It should be as personal as possible. Boldem can help with that:
Automatic declension of first names
Boldem can automatically inflect first names into the 5th case. To generate salutations, use the vokativ variable. Use this variable by inserting the following string into the template:
{{ vokativ contact.name }}
This string will be replaced after the message is dispatched with the recipient’s first name in the correct vocative form. For example, if the recipient’s first name is Jana, the template will show Jano. To address the recipient informally as Ahoj Jano, use the following string in the template:
Hi {{ vokativ contact.name }},
If you’d like to thank someone for registering, use the following string:
Thank you for registering, {{ vokativ contact.name }}!
Automatic surname declension by gender
In many cases of personalized salutations, you need to correctly inflect not only the recipient’s first or last name but also adjust the salutation itself based on the recipient’s gender. Since Boldem lets you record a recipient’s gender, using the resulting string is a breeze.
In certain cases, recipients’ gender is automatically assigned based on the provided first or last name (e.g., when creating manually or optionally during bulk import). For nonstandard names, gender won’t be set automatically, so it’s advisable to verify ambiguous names and enter them manually.
If gender is set for recipients, you can use the following string in the template instead of a specific salutation:
Thank you for registering{{ if contact.sex != null }}{{ if contact.sex == 1 }}, Mr. {{ end }}{{ if contact.sex == 0 }}, Ms. {{ end }}{{ vokativ contact.surname }}!{{ else }}!{{ end }}This string is actually scripting code that checks whether a given recipient has their gender set correctly and uses the appropriate salutation:
- If gender is set to Male and the recipient’s last name is Novák, the salutation used is: Thank you for registering, Mr. Novák!
- If gender is set to Female and the recipient’s last name is Svobodová, the salutation used is: Thank you for registering, Ms. Svobodová!
- If gender is not set, a gender-neutral salutation without a last name will be used: Thank you for registering!
You can, of course, customize the salutation text (shown in bold in the example) to suit your needs. We recommend always thoroughly testing the salutation on a small sample of test recipients with all variants (i.e., both genders and a recipient with no gender specified).

You can similarly distinguish the salutations “Dear Sir”, “Dear Madam”, or “Hello” when the recipient’s gender isn’t specified. In that case, use the following code in the template:
{{ if contact.sex != null }}{{ if contact.sex == 1 }}Dear Mr. {{ end }}{{ if contact.sex == 0 }}Dear Ms. {{ end }}{{ vokativ contact.surname }},{{ else }}Hello,{{ end }}The result is personalized salutations based on the specified gender:

Automation Scenarios
Before creating an automation scenario, decide what you want to achieve with the automation – e.g., whether you want to automatically message all customers on their name day, birthday, registration anniversary, or another date.
Also clarify whether you want to offer the recipient a discount in the email, how many times to notify them about it, and, if you run an online store, whether you want to check whether the recipient has purchased recently or not.
Below we’ve selected examples of automation scenarios you can create in Boldem for anniversary automation. This list is by no means exhaustive, and your imagination is the only limit — you can mix and match automation blocks to suit your needs:
- Automatic customer name-day celebration.
- Automatic celebration of a customer’s birthday or other anniversary event.
- Automatic customer anniversary celebration that takes their online store activity into account.
Automation scenario – name day celebration
This automated name-day campaign will help you reach customers who are celebrating their name day and send them a single email.

Create automation
- Log in to your Boldem account and go to the Automation section.
- Click Create new automation.
- Enter an automation name and a description. Both are for your reference and can be changed later on the Settings tab in the automation details.
- Confirm your submission by clicking Create automation.
The automation diagram opens, with an overview of blocks you can use in an automation on the left and a canvas on the right where you’ll place them. Adding is done by dragging and dropping individual blocks (drag and drop).
Remember that the automation isn’t saved automatically, so we strongly recommend saving it regularly by clicking the Done/Save button. You can edit the automation for as long as you like — it won’t activate until you click the Start button.
Automation trigger
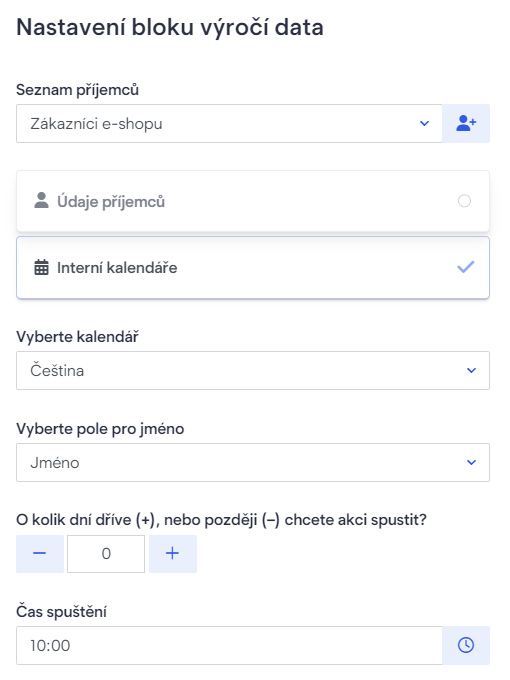
First we need to add a trigger block that tells the automation how and how often a recipient will enter it. For the anniversary campaign we’ll use the Anniversary event block.
- On the left, select the Triggers tab, drag the Anniversary event block onto the automation canvas, and double-click it to open the block settings.
- From the Mailing list drop-down menu, select the list you want to load recipients from.
- Click Internal calendars.
- Select Czech or Slovak from the drop-down menu, depending on whether you want the automation to send to recipients with Czech or Slovak first names.
- In the drop-down menu Select name field choose the field that contains the recipient’s first name. By default this is Name.
- Enter a positive or negative value, or leave zero, in the How many days earlier (+) or later (–) do you want to start the action? field.
- Value 0 – the automation will run for the recipient on the day their anniversary occurs.
- Positive value, e.g. 3: the automation will run for the recipient 3 days before the anniversary date.
- Negative value, e.g. -2: the automation will run for the recipient 2 days after the anniversary date.
- In the Start time field, enter the time when you want to start the automation for the recipient.
- Leave the other settings at their defaults and click Save.
Email dispatch
Now we’ll add a block to dispatch the email we want to use to address the recipient. For example, it could be an offer for a discount code.
- In the left pane select the Actions tab, drag the Send email block onto the automation canvas, and double-click it to open the block settings.
- From the Template drop-down menu, select the transactional template you want to send to the recipient.
- Leave the other settings at their defaults and click Save.
Click and drag to connect blocks:

Continue to the chapter Start and testing of automation.
Automation scenario – anniversary celebration based on a custom date
This anniversary campaign helps you automatically reach recipients who have a date assigned — typically a birthday or the anniversary of signing up for your e-shop — and send them a series of emails. The date must be assigned to the recipient via a custom field. For more information, see the chapter Custom fields.

Create automation
- Log in to your Boldem account and go to the Automation section.
- Click Create new automation.
- Enter an automation name and a description. Both are for your reference and can be changed later on the Settings tab in the automation details.
- Confirm your submission by clicking Create automation.
The automation diagram opens, with an overview of blocks you can use in an automation on the left and a canvas on the right where you’ll place them. Adding is done by dragging and dropping individual blocks (drag and drop).
Remember that the automation isn’t saved automatically, so we strongly recommend saving it regularly by clicking the Done/Save button. You can edit the automation for as long as you like — it won’t activate until you click the Start button.
Automation trigger
First we need to add a trigger block that tells the automation how and how often a recipient will enter it. For the anniversary campaign we’ll use the Anniversary event block.
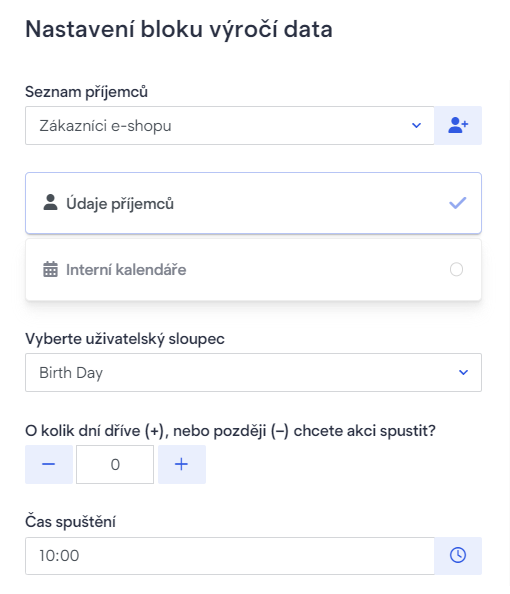
- On the left, select the Triggers tab, drag the Anniversary event block onto the automation canvas, and double-click it to open the block settings.
- From the Mailing list drop-down menu, select the list you want to load recipients from.
- Keep the Recipients’ details option.
- In the drop-down menu Select custom field, choose the custom field that contains the date.
- Do pole O kolik dní dříve (+), nebo později (–) chcete akci spustit? zadejte kladnou nebo zápornou hodnotu, případně ponechte nulu.
- Value 0 – the automation will run for the recipient on the day their anniversary occurs.
- Positive value, e.g. 3: the automation will run for the recipient 3 days before the anniversary date.
- Negative value, e.g. -2: the automation will run for the recipient 2 days after the anniversary date.
- In the Start time field, enter the time when you want to start the automation for the recipient.
- Leave the other settings at their defaults and click Save.
Email dispatch
Now we’ll add a block to dispatch the email we want to use to address the recipient. For example, it could be an offer for a discount code.
- In the left pane select the Actions tab, drag the Send email block onto the automation canvas, and double-click it to open the block settings.
- From the Template drop-down menu, select the transactional template you want to send to the recipient.
- Leave the other settings at their defaults and click Save.
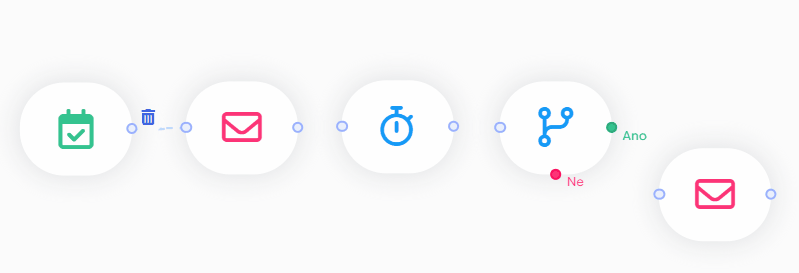
Click and drag to connect blocks:
Insert Delay
After sending an email, you can set a delay — the time you give the recipient to respond to your message. Use this and the following steps if:
- the first email contains a purchase incentive (e.g., a discount offer) and you want to evaluate whether the recipient purchased and, if not, encourage them to take advantage of this offer, or
- you want to determine whether the recipient opened the email or clicked a link in it, and prompt them to take action.
How to add a delay:
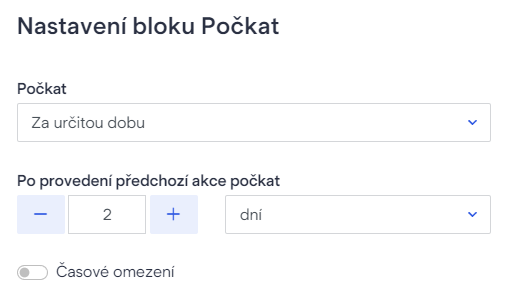
- In the left pane, select the Operators tab, drag the Wait block onto the automation canvas, and double-click it to open the block settings.
- From the drop-down menu, select After a certain time and choose a delay, e.g., 2 days.
- Click Save.
Insert conditional block
After the delay, we want to check whether the recipient responded to our message. Insert a conditional block into the automation. Follow these steps:
- On the left, select the Operators tab, drag the Condition block onto the automation canvas, and double-click it to open the block settings.
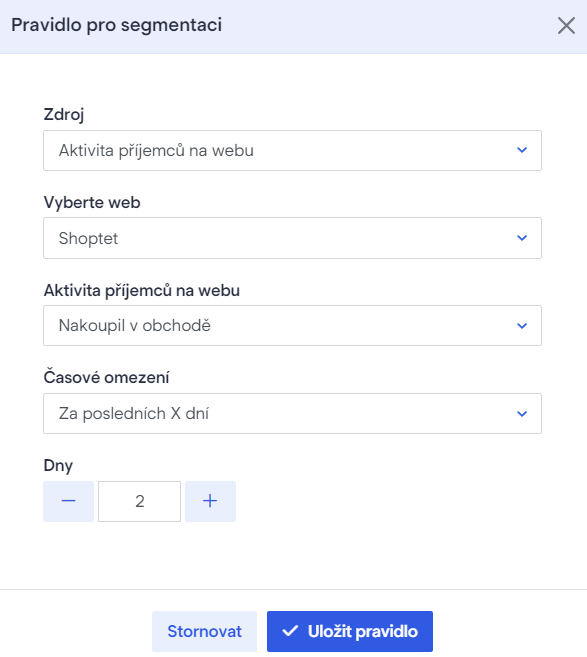
- Click Select new condition. A dialog to select a condition will open.
- Depending on what you want to evaluate, select the corresponding activity type from the Source drop-down menu:
If your online store is integrated with Boldem and in the first email you encouraged the recipient to make a purchase, select Recipients’ activity on the website.
- In the Select website drop-down, choose a previously integrated online store. If you don’t see the store in the list, the integration wasn’t set up correctly. Check the status in Settings/Integrations or add the online store.
- In the drop-down menu Recipients’ website activity, select Purchased in store.
- In the drop-down menu Time range, choose the period over which the condition should be evaluated. In our case we want to evaluate the last two days — so select Last X days and enter 2 for the number of days.
- Click Save rule.
If you don’t have an integrated website, or want to evaluate only the recipient’s activity in the previous email, select Recipients’ activity in transactional emails from the drop-down menu.
- In the drop-down menu Condition, select the condition that fits your needs, e.g., Recipient opened the email or Recipient clicked a link in the email.
- In the Template drop-down menu, select the transactional template you entered in the Send email block in the previous step.
- In the drop-down menu Time limit select the same duration you entered in the previous Wait block. In our example, that’s 2 days.
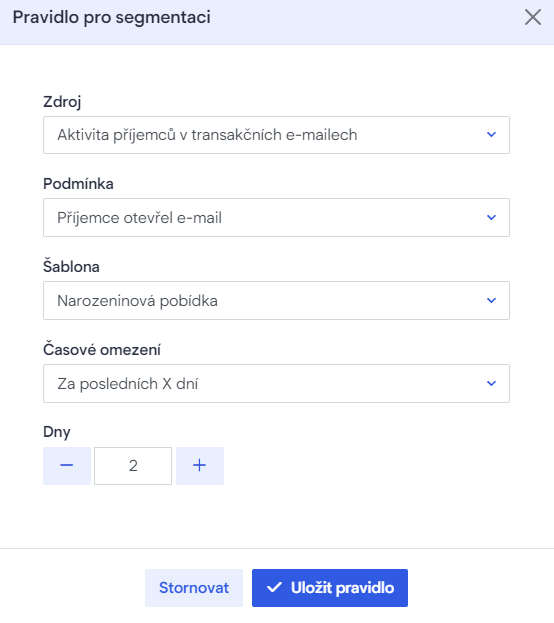
- Click Save rule.
- Click Save to save the entire block.
After the condition block, we add additional blocks to account for its feedback. Two branches are available — one for a positive result and one for a negative result:
Conditional block branch – Yes
If the recipient met the condition you set — in our example, purchased from our store in the last 2 days or opened the email sent in the last 2 days — you can leave this branch empty if you consider the recipient’s activity sufficient. In that case, the automation ends for that recipient.
Optionally, if you want to track recipient activity by a custom flag, you can create a custom field and assign it a value using the Edit recipient block. Find instructions for creating and using a custom field in the article Custom fields.
You can also optionally add recipients to another mailing list, for example if you want to sort recipients by their responses to the content you send. Use the Edit mailing list action for this purpose.
Conditional block branch – No
If the recipient doesn’t meet the condition you set — for example, they don’t make a purchase in our store within 2 days, or they don’t open the email sent in the last 2 days — consider adding another block after this branch to dispatch an email that notifies the recipient about the earlier offer.
How to add a block to email dispatch:
- On the left, select the Actions tab, drag the Send email block onto the automation canvas, and double-click it to open the block settings.
- From the Template drop-down menu, select the transactional template you want to send to the recipients.
- Leave the other settings at their defaults and click Save.
The email should be engaging and build on the previous message; for example, it should highlight that a discount is waiting for the recipient and that it will expire after the number of days you set.
You can then repeat the procedure and add another delay and repeated feedback if you find it appropriate.
Connect individual blocks by clicking and dragging:
Testing and starting the automation
You can further customize the automation to suit your needs — adjust the number and type of emails sent, delays, and conditions over time and test which work best for your customers.
Once you’re satisfied with the settings and the number of blocks, save the automation by clicking Done/Save.
Thoroughly test the automation before starting it! Testing procedures can be found in the article Automation Testing. We recommend not underestimating testing and starting the automation only after thorough testing.
Once you’ve completed testing with a successful result, start the automation by clicking Start.