In this guide we’ll walk you through configuring the domain records DKIM, SPF, DMARC, and CNAME (domain router) with the provider Active24 — or more precisely its subsidiary Websupport, to which client accounts were transferred. These records must be set if you want to safely send bulk emails from the Boldem app and prevent messages from ending up in spam.
- Log in to your Boldem account.
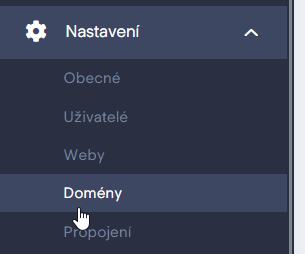
- In the left menu, select Settings and click Domains.
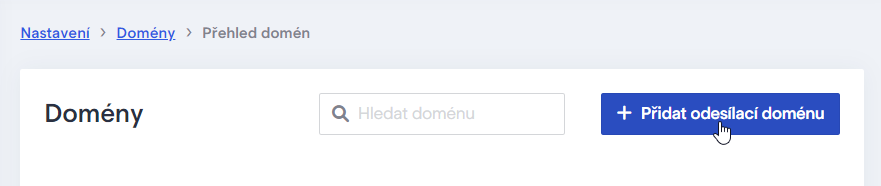
- If you didn’t enter a sending domain name when creating your account, click the + Add sending domain button. If you already entered the domain when creating your account and see it in the list, proceed to step 4 below.
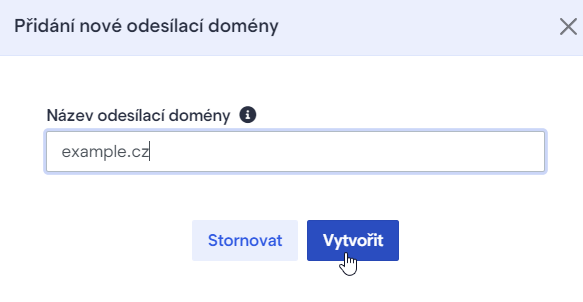
- Enter the sending domain and confirm with the Create button. Enter the domain without www, e.g. example.cz.
- Click the Details button for the domain in the list.

- Click the Domain Settings tab.
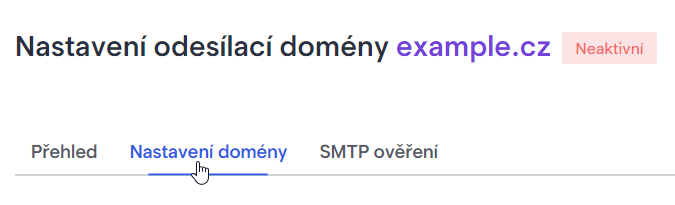
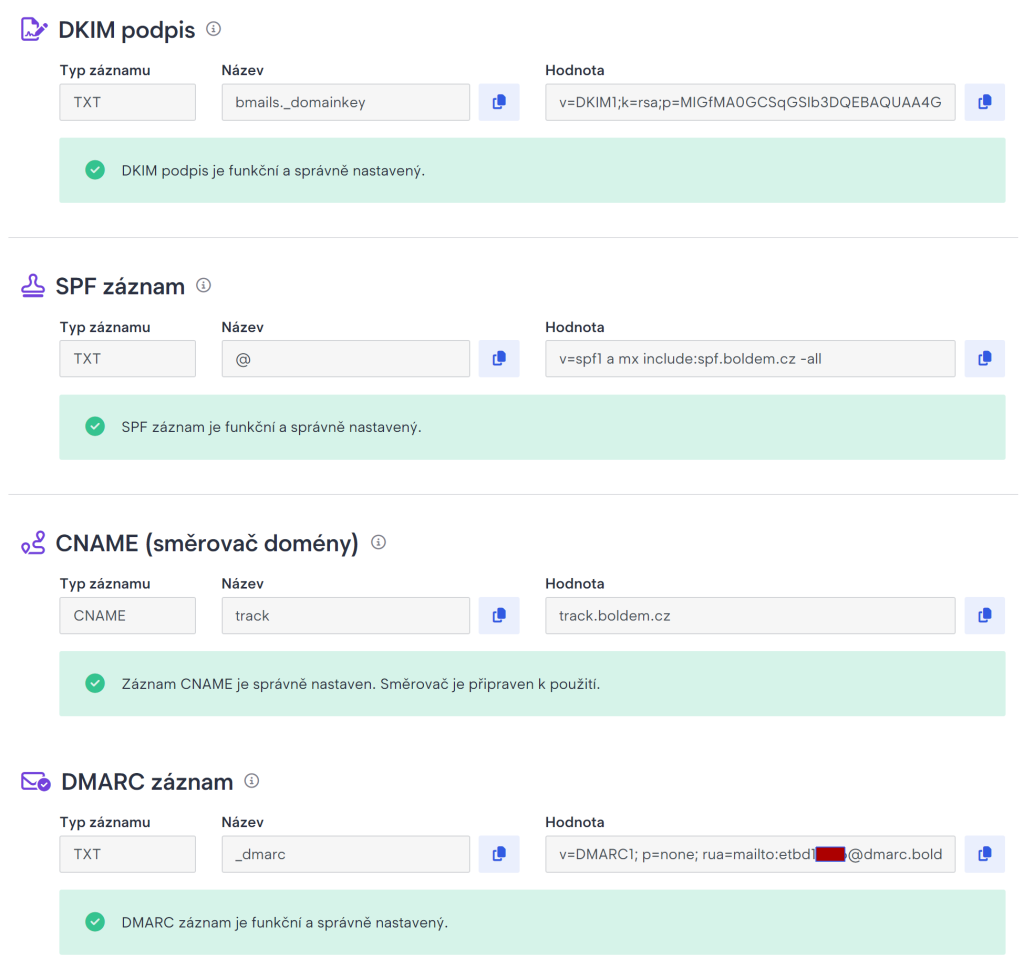
The page will display the DKIM signature, SPF record, and CNAME record. Keep this window open; you’ll need it in a moment.
- In the new window, sign in to your account to manage your domain with provider Active24 (Websupport) at https://admin.websupport.cz/.
- Click Domains and select the domain in the list whose settings you want to change.

- In the left-hand menu, select DNSThe Domain Name System (DNS) is a hierarchical and distributed naming system for computers, services, and other resource... and click DNS Settings. A list of domain records will appear.

DKIM Record Settings
- In the Websupport (Active24) interface, select TXT from the left menu.
- On the right, click the Create New Record button.
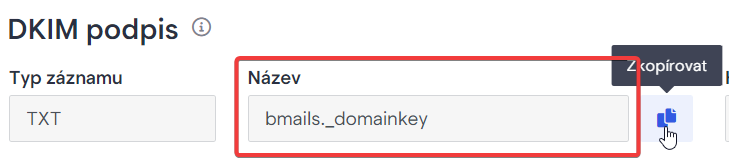
- In your Boldem account, in the DKIM signature section, copy the required record from the Name custom field by clicking the copy icon.
- In the Websupport (Active24) interface, paste the copied value into the To address field.
- In your Boldem account, in the DKIM signature section, in the Value column copy the required record by clicking the copy icon.

- In the Websupport (Active24) interface, paste the copied value into the Value field.

- Do not change the value in the TTL menu.
- Save the record by clicking the Create button. An overview of all TXT records will appear, and the newly added record will look something like this:

SPF Record Settings
Important notices:
- Each domain or subdomain can have only one SPF record.
- If your domain already has an SPF record, do not create a new one — add the value from the Boldem app to the existing SPF record.
- When checking TXT records with SPF data, be careful that you are editing the correct domain! SPF values can differ for the root domain (e.g., example.cz) and for a subdomain (e.g., subdomena.example.cz). In your Boldem account you will most likely use the root domain (example.cz).
- An SPF record can contain entries for up to 10 domains.
Edit existing SPF record
If you find a TXT record in the list of domain records that contains SPF information for your domain (for example, example.cz), you should edit that record instead of creating a new one. Example of an existing record:

If you find a question mark (?all) at the end of an existing SPF record, it means the SPF record is inactive! In that case, when editing (see the procedure below) replace the question mark with a hyphen, i.e. -all. Before updating the record, contact your domain administrator (registrar) to discuss why the question mark was used in the settings.
- Click the Edit button on the row to the right of this record.
- A new dialog to edit the data will appear. In the Value field, insert the string include:spf.boldem.cz before the tag ~all or -all, or replace the tag ?all with the tag -all.

- Save the record by clicking the Save button.
Adding a new SPF record
If you don’t find a TXT record that contains SPF information for your domain in the list of domain records, follow these steps:
- In the Websupport (Active24) interface, click the Create New Record button on the right.
- Enter the @ symbol in the To address field.
- Do not change the TTL value.
- In your Boldem account, in the SPF record section, copy the required record from the Value custom field by clicking the copy icon.

- In the Websupport (Active24) interface, paste the copied value into the Value field.

- Save the record by clicking the Create button. The resulting record will look something like this:

DMARC Record Settings
- Each domain or subdomain can have only one DMARC record.
- If your domain already has a DMARC record, do not create a new one and incorporate the information from Boldem into the existing DMARC record.
- When checking TXT records containing DMARC data, be careful that you are editing the correct domain! DMARC settings can differ between the root domain (e.g., example.com) and a subdomain (e.g., subdomena.example.com). In your Boldem account you will most likely use the root domain form (example.com).
Edit existing DMARC record
Click the TXT records tab. If you find a TXT record in the list of domain records that contains DMARC data for your domain (e.g., example.com), edit that record instead of creating a new one. Example of an existing record:
v=DMARC1; p=none; rua=mailto:dmarc@example.com- Click the Edit button on the row to the right of this record.
- A new dialog to edit the details will appear. In the Value field, paste the value you copied from your Boldem account’s Value section. Copy only the part of the string starting with mailto. Example DMARC value in Boldem:

- In this case, copy only the mailto:pdgpt8b8@dmarc.boldem.cz part.
- At the end of the section of your existing record that starts with rua, add a comma and paste the copied portion of the record. The resulting form of the example above would be:
v=DMARC1; p=none; rua=mailto:dmarc@example.com,mailto:pdgpt8b8@dmarc.boldem.cz- Save the record by clicking the Save button.
Add New DMARC Record
If you don’t find a TXT record in the list of domain records that contains DMARC information for your domain, follow these steps:
- In the Websupport (Active24) interface, click the Create new record button on the right.
- A dialog box will appear for you to fill out.
- In the Pro adresu field, enter the value you copied from your Boldem account in the DMARC record section from the Name custom field by clicking the copy icon.

- Do not change the TTL value.
- Paste into the Value field the code you copied from your Boldem account in the DMARC record section, in the Value custom field, by clicking the copy icon.

- Save the record by clicking the Create button.
CNAME Record Settings (domain router)
- In the Websupport (Active24) interface, select the CNAME entry under DNS settings in the left-hand menu.
- On the right, click the Create New Record button.
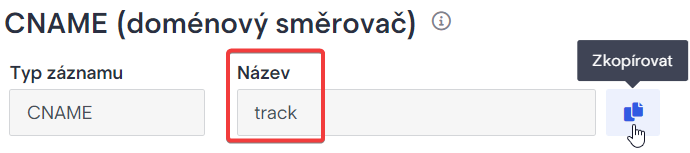
- In your Boldem account, in the CNAME (domain router) section, in the Name custom field, copy the required record by clicking the copy icon.
- In the Websupport (Active24) interface, paste the copied value into the To address field.
- Do not change the TTL value.
- In your Boldem account, in the CNAME (domain router) section, copy the required record from the custom field Value by clicking the copy icon.

- In the Websupport (Active24) interface, paste the copied value into the Value field.

- Click the Save button to save the record. The resulting record will look something like this:

Domain record validation
After you set up the records, it can take some time for the information to propagate to DNS servers. For most providers this should happen within an hour, and usually no later than 24 hours.
After setting up all records, go to Settings/Domains in the Boldem app, select your domain, and on the Domain Settings tab click the Check settings button.

The ideal result of the check should be green-highlighted information for each record:
If domain changes don’t take effect after 24 hours, contact your domain provider’s support to verify that the records were entered correctly, then repeat the domain verification process in the Boldem app.
Missing certificate for HTTPS
When validating the CNAME record, you may encounter the following error:
The CNAME record is configured correctly. However, to enable full functionality you still need to set up a certificate for HTTPS.

This error occurs when the domain contains a CAA (Certification Authority Authorization) record. A CAA record allows domain owners or administrators to declare which certificate authorities may issue SSL certificates for the domain.
When using Boldem, we use a Let’s Encrypt certificate, so add a new record to your domain with this identifier. Leave existing CAA records unchanged.
Example of adding a record with provider Wedos (Vedos):
- After logging in to the domain administration, click the domain you want to edit.
- Select the Edit DNS records. An overview of the domain’s records will appear.
- Check whether a CAA record containing the keyword “letsencrypt.org” exists among the records, and if not, add one by clicking new record.
- Leave the Name field blank and keep TTL at its default. In the Type field, select CAA.
- Enter the following in the Data field:
0 issue “letsencrypt.org”

- Click Save record.
The resulting CAA record:

Confirm by clicking the Apply changes button.
Wait 60 minutes and try verifying the domain records in the Boldem app again. If the error persists after another 24 hours, contact customer support.