To make your emails and SMS messages feel as personal as possible to recipients, you should not only send content targeted to them but also address them by their first or last name in the correct form, ideally with gender distinction. This makes messages more personal and increases the chance that recipients will open and read yours among the flood of other messages, or even remember something from them. Boldem performs these functions automatically, but you need to set everything up correctly first.
Recipient gender settings
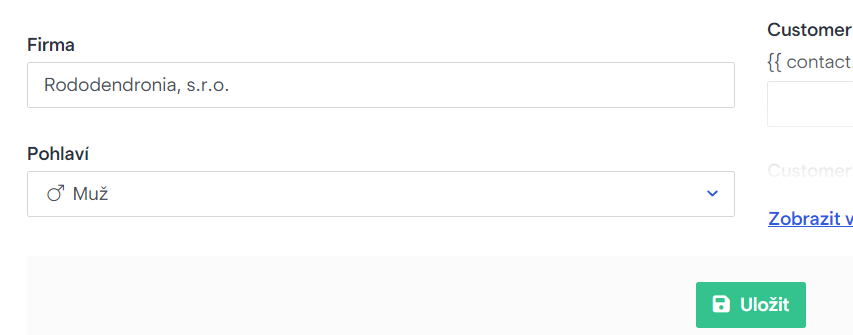
To achieve the best results with personalized salutations, it’s recommended to have each recipient’s gender specified. You can set this value manually in the mailing list on the Edit recipient tab.
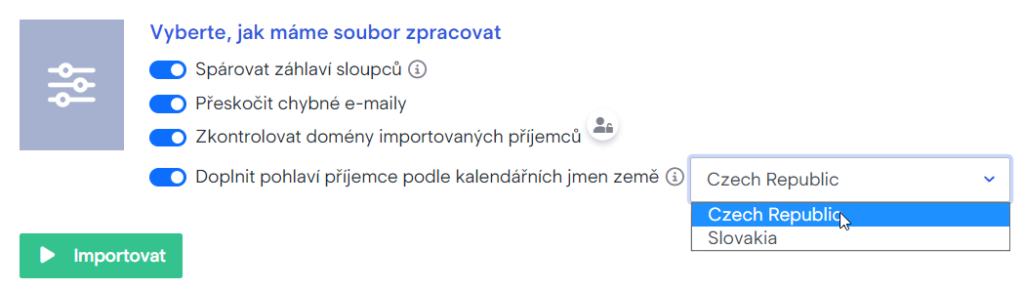
Manual data updates aren’t practical for obvious reasons, so you can check the option Fill recipient gender based on the country’s name-day calendar when importing recipients. If the imported data contain Czech or Slovak first names, gender will be filled automatically. If a recipient has an unusual name, the gender likely won’t be filled and you’ll need to correct it manually.
You can, of course, import a mailing list that already includes gender. In that case it’s most practical to name the custom field Gender with values Male or Female for each recipient.
Automatic declension of first names
The vocative feature for inflecting names into the correct form is intended for Czech. If you send newsletters in Slovak, do not use it, because Slovak almost exclusively uses the nominative for direct address, so the name form doesn’t need to be changed.
Boldem can automatically inflect first names into the 5th case. To generate salutations, use the vokativ variable. Use this variable by inserting the following string into the template:
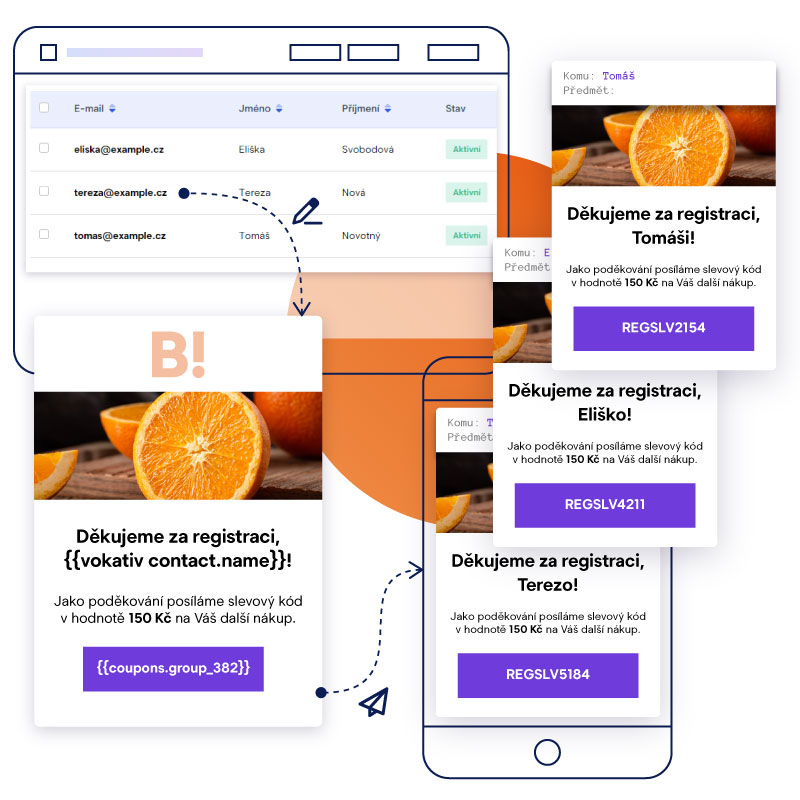
{{ vokativ contact.name }}
This string will be replaced after the message is dispatched with the recipient’s first name in the correct vocative form. For example, if the recipient’s first name is Jana, the template will show Jano. To address the recipient informally as Ahoj Jano, use the following string in the template:
Hi {{ vokativ contact.name }},
If you’d like to thank someone for registering, use the following string:
Thank you for registering, {{ vokativ contact.name }}!
Automatic declension of surnames by gender
The vocative feature for inflecting names into the correct form is intended for Czech. If you send newsletters in Slovak, do not use it, because Slovak almost exclusively uses the nominative for direct address, so the name form doesn’t need to be changed.
In many cases of personalized salutations, you need to correctly inflect not only the recipient’s first or last name but also adjust the salutation itself based on the recipient’s gender. Since Boldem lets you record a recipient’s gender, using the resulting string is a breeze.
In certain cases, recipients’ gender is automatically assigned based on the provided first or last name (e.g., when creating manually or optionally during bulk import). For nonstandard names, gender won’t be set automatically, so it’s advisable to verify ambiguous names and enter them manually.
If gender is set for recipients, you can use the following string in the template instead of a specific salutation:
Thank you for registering{{ if contact.sex != null }}{{ if contact.sex == 1 }}, Mr. {{ end }}{{ if contact.sex == 0 }}, Ms. {{ end }}{{ vokativ contact.surname }}!{{ else }}!{{ end }}This string is actually scripting code that checks whether a given recipient has their gender set correctly and uses the appropriate salutation:
- If gender is set to Male and the recipient’s last name is Novák, the salutation used is: Thank you for registering, Mr. Novák!
- If gender is set to Female and the recipient’s last name is Svobodová, the salutation used is: Thank you for registering, Ms. Svobodová!
- If gender is not set, a gender-neutral salutation without a last name will be used: Thank you for registering!
You can, of course, customize the salutation text (shown in bold in the example) to suit your needs. We recommend always thoroughly testing the salutation on a small sample of test recipients with all variants (i.e., both genders and a recipient with no gender specified).

You can similarly distinguish the salutations “Dear Sir”, “Dear Madam”, or “Hello” when the recipient’s gender isn’t specified. In that case, use the following code in the template:
{{ if contact.sex != null }}{{ if contact.sex == 1 }}Dear Mr. {{ end }}{{ if contact.sex == 0 }}Dear Ms. {{ end }}{{ vokativ contact.surname }},{{ else }}Hello,{{ end }}The result is personalized salutations based on the specified gender:

Using variables to further personalize
Throughout the Boldem app, you can use so-called variables in editors. There are several types of variables, but they all work the same way — they’re a string enclosed in a pair of curly braces that replaces specific data. Example:
{{ contact.name }} {{ contact.surname }} ({{ contact.email }})
{{ contact.company }}
It’s quite easy to use. Copy the string and paste it into the template where you want it to appear. After dispatch and when displayed to the recipient, the message will contain the actual text instead of the bracketed string.
In the example below, the recipient’s first and last name will be displayed with the email address in parentheses and the company name:
Alena Boldemová (Alena.Boldemova@example.cz)
První Boldemová, s.r.o.
You can also create your own variables and assign them any values. There are several types of variables. See details below and in the referenced chapters:
- Custom variables – variables you create in Settings/Variables and then use in any campaign or template. They can be recurring parts of templates, such as contact information, headers, footers, and the like.
- Predefined variables – basic variables, such as the aforementioned first names, last names, company name, and similar. Variables can be used in scripting code, with conditional logic, to format outputs, and so on.
- Custom fields – fields where you can enter properties of your recipients.
Testing
Before sending a live delivery, don’t forget to thoroughly test your message! For this purpose, we recommend creating a mailing list and checking the Mailing list for test deliveries box.

Then add at least three recipients with addresses you can access to this list:
- male recipient,
- female recipient,
- recipient with no specified gender.
If you then select Options/Send test in the template editor, you’ll have this list available in the drop-down menu Test list. You can quickly send a test message of the personalized template to it to verify that everything displays as you expect.