Automations in Boldem are a useful tool to replace a lot of repetitive and time-consuming tasks. However, for automation to serve its purpose, it needs to be thoroughly tested. In this article, you will learn how to elegantly test automations in Boldem before running them with real data.
Boldem allows you to test automation scenarios without having to run them for all users. Generally, there are two methods to test the automation:
- By using the Test Automation function from the Options menu – this function simulates the behavior of the automation by setting the appropriate parameters and shortening the time limits specified in the Wait blocks. This process allows you to test the automation before launching it.
- By configuring the operator’s email in the message-sending blocks – once you start the automation, messages will be delivered to the email address you specify (support department, tester, etc.), instead of the regular user.
Test automation function
Testing automation using this feature is the safest option, as it can be completed before initiating the automation and does not require waiting for set deadlines in the Wait blocks to expire. The procedure is as follows:
- Create the automation the way you want it to work.
- Save the automation.
- Click Options and select Test automation.
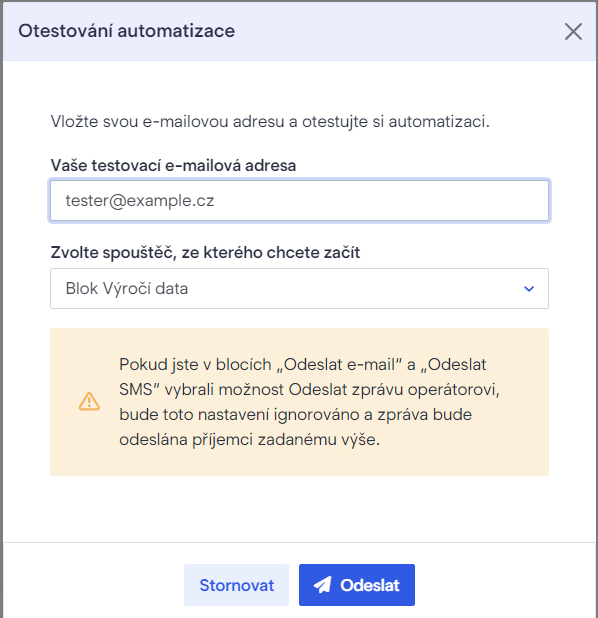
- A dialog box will appear for testing the automation. Its content will vary depending on the elements you are working with in the automation, particularly the triggers you have set. For example, if your automation sends messages based on specific dates, calendars, or anniversaries, this menu will be displayed:

- In the Your test email address field, enter the email address to which you want to send messages that would normally arrive to the user going through the automation. By default, the email address of your Boldem account creator will be filled in.
- In our example, the automation consists of a single trigger, the anniversary event, making it the sole option provided. If you have multiple triggers in the automation, you can select the one you want to test from the menu.
- Confirm your entry by clicking Submit.
- The automation steps will progress according to your inputs, with the exception that any blocks used to send messages will be rerouted to the recipient specified in the field above.
You can repeat the testing as many times as needed. Once you are satisfied with the results, save the automation and click either Start or Start automation.
Testing via operator email
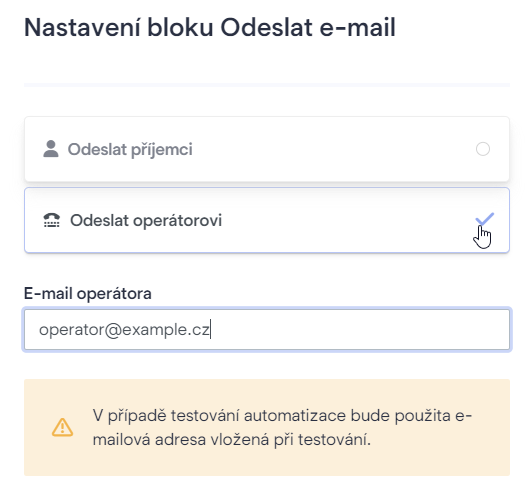
You can also test automation by adjusting individual blocks responsible for sending email or SMS messages. In these blocks, you can specify that the messages, which would typically be sent to users, should instead be directed to an address of your choice known as the operator. The operator can be your tester, customer support, or another designated recipient. The procedure is as follows:
- Create the automation the way you want it to work.
- Click all the blocks that send emails or SMS messages.
- In Block settings, select Send to operator.

- In the Operator email field, enter the email address to which you would like to send automation messages.
- Save the block.
- After editing all the blocks that send messages, save the entire automation and run it.
The automation will run based on the scenario you select and collect data from real users of your online shop or website, while all messages will be sent to the email address you provide.
After completing the testing, make sure to revisit the automation and restore the settings of each block responsible for sending messages. This ensures that emails and SMS messages are directed to the intended recipients and not the operator.
Testing abandoned cart automation
We will also test an example of automation that monitors abandoned carts and sends notifications to online shop users.
- Create automation to track abandoned shopping carts.
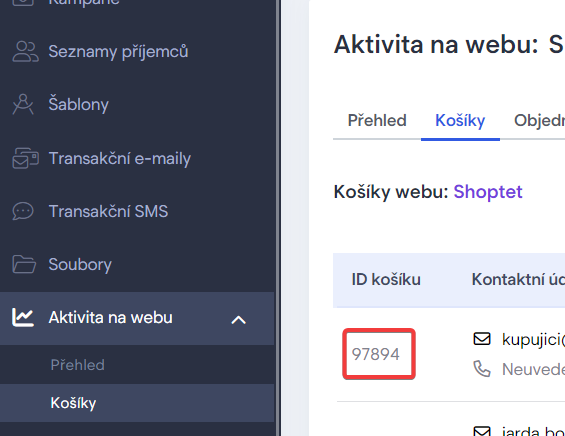
- In the Boldem app, navigate to Website activity, choose your shop, and click Shopping carts. If you do not see any existing carts, visit your shop’s website, create a test user, and log into the shop to add items to your cart.
- Wait for the cart data to be transferred to Boldem.

- Copy your cart ID.
- Go to Automations and select the automation you created earlier for the abandoned cart.
- Click Options and select Test automation.
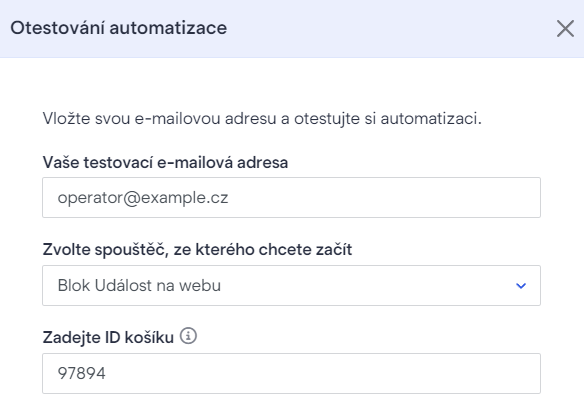
- A dialog will appear to test the automation.
- Enter the email address to which you would like to send automation emails.
- If you are not using multiple triggers, leave the trigger field at its default setting.
- In the Enter cart ID field, enter the previously copied cart number, and confirm the dialog by clicking Send.

After submission, you will receive the test automation results in the email address you have chosen, typically in an email containing the products from the abandoned cart with the provided ID. In just a few minutes, you can easily verify if your automation is configured correctly. Once confirmed, you can proceed to run it for your customers.
Naturally, you can also test the automation after it has been initiated. The only limitation in this case is that automation for an abandoned cart is set to begin by default after at least 2 hours. So, if you create a test user in your shop who adds items to the cart but does not complete the purchase, the automation will start for them after 2 hours (or later, depending on the delay you have configured in the Website event block).
You can track user details and their progress within the automation via the Recipients’ activity tab in the automation details.