To make full use of the Boldem automated marketing tool to send out email campaigns, you must first follow these steps:
- Verify the email address used to create your Boldem account
- Verify the sending domain
- Create a mailing list
- Import recipients database
- Create a template
- Send out an email campaign
1. Verification of the email address used to create your Boldem account
Upon creating your new account, it’s essential to verify your identity by clicking the link in the email sent to you. If you don’t receive the email shortly after registration, and it’s not in your spam folder, click the Resend link in the top menu to have it resent. Alternatively, you can log out and log back in to access the link for resending the confirmation email.
2. Verification of the sending domain
It’s crucial to use a custom sending domain to ensure secure delivery and minimize the risk of bulk messages being marked as spam. The email address from this verified domain will then serve as the sender for all your campaigns. If you work with multiple domains, you can verify each one within your account. This allows you to select the desired sender domain whenever you send out a campaign.
To verify a domain, you’ll need access to its DNSThe Domain Name System (DNS) is a hierarchical and distributed naming system for computers, services, and other resource... records settings, often referred to as the domain name server records. Typically, your domain registrar, web hosting account manager, or DNS server provider supplies these settings. Ensure you have this access information on hand, or ask your domain administrator to provide it for you.
Step-by-step verification of the sending domain
- After logging into your Boldem account, select Settings from the left-hand menu and click Domains.
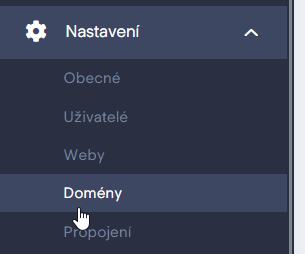
- If you did not enter a sending domain name when you created your account, click + Add a sending domain. However, if you already entered a domain and see it listed, skip to step 4 below.

- Enter the name of the sending domain and confirm with Create. Make sure to enter the domain without www, e.g. example.cz.
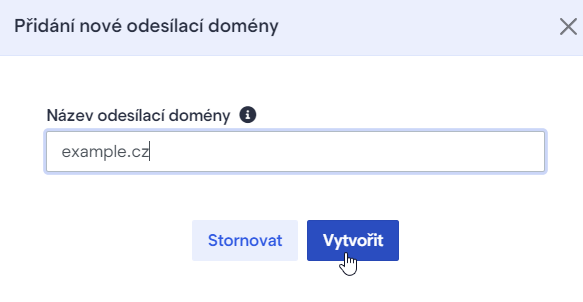
- Click Detail by the domain in the list.

- Click the Domain settings tab.

- Leave the window with these settings open as you will require the data from it during setup.
- In a new window, log in to the system to manage your domain or domain DNS records. If your domain is with any of the providers listed below, click the relevant link for more detailed instructions. If your provider is not listed, follow the general steps below.
- Setting up DNS records with FORPSI
- Setting up DNS records with Active24
- Setting up DNS records with Domena.cz
- Setting up DNS records with Gigaserver
- Setting up DNS records with GoDaddy
- Setting up DNS records with Webglobe
- Setting up DNS records with Wedos
- Setting up DNS records in cPanel
- Setting up DNS records in Plesk
Setting up DNS records (general procedure)
In this tutorial, we will guide you through the process of setting up the DKIM, SPF, and CNAME domain records. Setting up these records is essential to securely send bulk emails from the Boldem app and prevent emails from being marked as spam.
In your domain or domain records manager, go to the section where you edit DNS records (domain records, DNS zone, zone editor etc.) and select the domain you want to modify.
In the settings, when creating a record, you’ll need to select the type, hostname, TTL (time to live), and the value/record.
- In the Record type field, select the type of record (TXT, DKIM, CNAME).
- Use the Hostname field to specify the name of the record. Copy the value from your Boldem account settings.
- DNS records can be cached by local DNS servers for a duration set in seconds, as indicated by the TTL (time to live) field. We recommended retaining the default value and avoid changing it.
- The Value/Record field serves the purpose of indicating the actual value for the designated record. This value is again copied from the Boldem account settings.
Setting up DKIM record
- In the Type field, select TXT.
- Into the Hostname field, enter the information you copied from the Name section of your Boldem account by clicking the copy icon.

- Do not change the value of TTL.
- In the Value/Record field, enter the code you copied from your Boldem account in the DKIM signature section of the Value column by clicking the copy icon.

- Save the record by clicking the appropriate button.
Setting up SPF record
Important notes:
- Each domain or subdomain can have only one SPF record.
- If your domain already contains an SPF record, do not create a new one. Instead, insert the data from the Boldem application into the existing SPF record.
- When checking TXT records with SPF data, make sure you are modifying the data for the correct domain! The SPF data may be different for the base domain form (e.g., example.com) and for the subdomain (e.g., subdomain.example.com). In the Boldem account, you are most likely to use the base domain form (example.com).
- An SPF record can contain data for up to 10 domains.
Modifying existing SPF record
In case you find a TXT type record in the list of domain records containing SPF information for your domain (e.g., for example.com), make sure you modify the record and not create a new one. Example of an existing record:
example.com TXT 1800 v=spf1 a mx include:_spf.forpsi.com ~all- Click the edit button on the row of the given record. Into the Value/Record field, paste the string include:spf.boldem.cz before the tag ~all. The final form of the aforementioned example would be:
example.com TXT 1800 v=spf1 a mx include:_spf.forpsi.com <em><strong>include:spf.boldem.cz</strong></em> ~all- Save the record by clicking the appropriate button.
Adding new SPF record
If you do not find a TXT type record in the list of domain records that contains SPF information for your domain, proceed with these steps:
- In the Type field, select TXT.
- Into the Hostname field, paste the information that you copied from the Name field of the SPF record section in of your Boldem account by clicking the copy icon.

- Do not change the value of TTL.
- Into the Value/Record field, paste the code you copied from the Value field of the SPF record section in your Boldem account by clicking the copy icon.

- Save the record by clicking the appropriate button.
Setting up CNAME (Domain Name Router) record
- In the Type field, select CNAME.
- Into the Hostname field, paste the information you copied from the Name field of the CNAME section in your Boldem account by clicking the copy icon.

- Do not change the value of TTL.
- Into the Value/Record field, paste the string you copied from the Value field of the CNAME section in the Boldem account by clicking the copy icon.

- Save the record by clicking the appropriate button.
Validating domain records
Once the records are set up, there is a delay before the information is acknowledged by the domain servers. With most providers, this process completes within an hour or within 24 hours at the latest.
After setting up all records, navigate to Settings/Domains in the Boldem application, select your domain, and on the Domain Settings tab, click Check Settings.

Ideally, the check should result in green-highlighted information for each record:
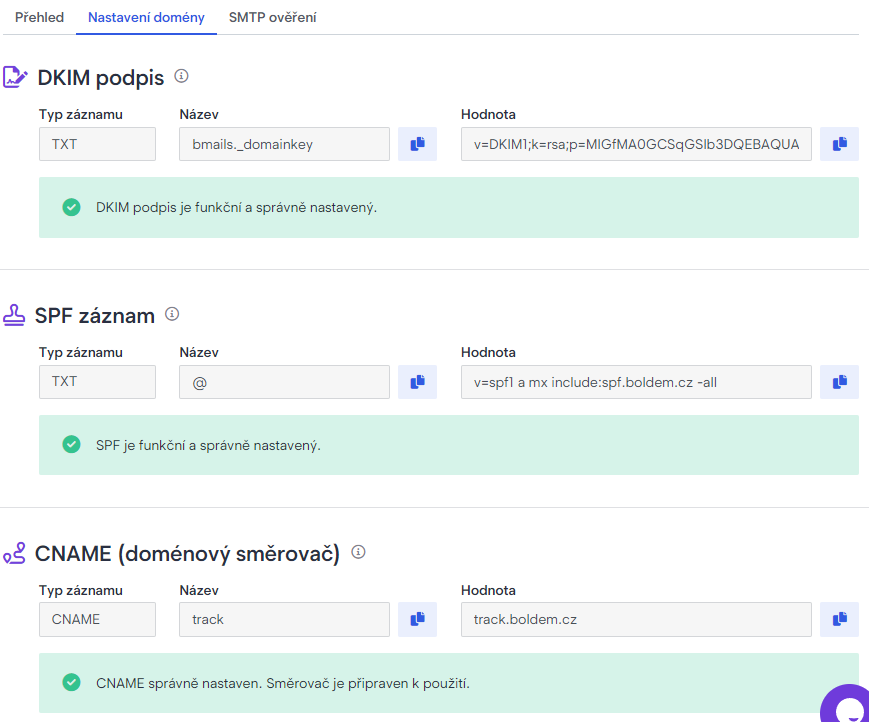
If the changes to the domain do not take effect even after 24 hours, contact the customer support of your domain provider to verify that the records are entered correctly and then repeat the verification of domain settings in the Boldem application.
3. Creating mailing list in Boldem
Before you can dispatch your first campaign, you must first create a mailing list.
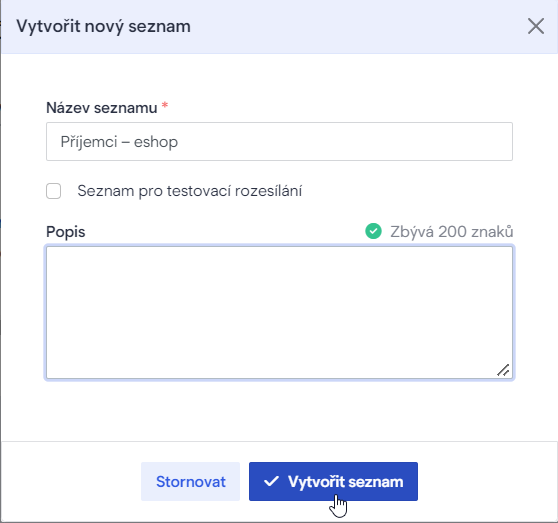
- After logging into your Boldem account, select Mailing lists from the left menu and click Create a mailing list.

- Enter the name of the mailing list and click Create a mailing list.
4. Importing recipients database
In order to dispatch your campaign to someone, you will need to import the recipients database first.
- Once you have created a mailing list, click Add recipient on the right and select how you want to add the recipients. To add one or two recipients, you can use the Add recipient option. However, it is more likely that you will want to import a larger number. For such cases, select Import recipients in bulk.
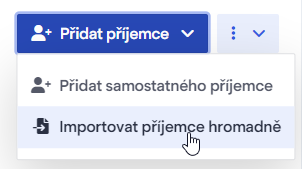
- Follow the wizard instructions to add new recipients through bulk importing.
5. Creating template
- After logging into your Boldem account, select Templates from the left menu.
- You have several options on how to proceed:
- You can create a completely new template according to your preferences by clicking Create a new template and selecting Create a smart template.
- You can create an HTML template by clicking Create a new template and selecting Create an HTML template.
- You can click the Ready-made tab and select one of the ready-made templates and customize it to your liking.
6. Dispatching a campaign
Finally, you can set up and dispatch your first email campaign! You can either choose to dispatch the campaign immediately, or schedule it for a future date and time.
In your Boldem account, go to Campaigns, click New campaign and select the type of campaign you wish to dispatch. Follow the wizard instructions and dispatch or schedule your first campaign!
Need help?
If you have any questions, refer to our instructional videos, or browse the Boldem blog. For direct assistance, click the chat icon in the bottom-right corner to contact our customer support.
You might also be interested in: