This automated reactivation campaign is designed to re-engage customers who have previously made purchases but have not responded to your messages for an extended period.
Automation goal
The goal of reactivation automation is to automatically motivate recipients who have not made purchases from your online shop or interacted with your messages in a while to take action. Additionally, it can help maintain a clean recipient database by automatically unsubscribing those who show no interest in responding at all. This database cleanup ensures more precise results for your outreach campaigns, preventing unresponsive contacts from distorting your open and click-through rates.
The automation is designed as a sequence of emails with the aim of providing recipients with compelling content that encourages them to click links in the emails or at least open them, thereby reactivating their engagement. Such content might include promo codes, trial subscriptions, or other special offers.
Recipients who go through the automation without any interaction with your messages can be automatically unsubscribed.
Prerequisites
To create an automation, you will require:
- Activated Boldem Profi plan in your Boldem account.
- Online shop or other kind of website integrated with a Boldem account.
- Fully verified sending domain.
- A mailing list from which you want to add recipients to the automation.
- Transactional template – the message you intend to send to the recipients.
- Promo codes (optional) – if you decide to offer promo codes to customers as a part of your automation, you will need to add them first.
See the sections below for details on each step.
Integrating website or online shop with your Boldem account
If you do not run an online shop or a website to collect recipients and do not need to assess whether recipients have made recent purchases in your store as part of the reactivation automation, you can skip this step. However, in other scenarios, it is beneficial to integrate your account with Boldem.
To ensure that Boldem can efficiently retrieve data from your website (online shop or other systems) and make the most of its features including automation and subscription forms, you must first integrate your website with your Boldem account. The following options are available:
- Generic integration that enables you to embed a form on your website for data collection.
- Instant integration of your online shop running on the Shoptet or Upgates platform to seamlessly sync your contact database, cart, and order data.
- Extended integration of any website or online shop on any platform, allowing, in addition to subscription form display, also, e.g., synchronization of contacts, orders, or shopping carts data. However, this integration requires the intervention of a developer who will create a customized integration for you.
Boldem account with the Profi plan or higher is required for full functionality of the integration (Standard plan only allows synchronization of recipients with ready-made integrations). You can upgrade to the Profi plan at any time via Billing. If you encounter difficulties when upgrading to a higher plan, please contact your salesperson or our customer support via email, phone, or chat.
Below, you will find instructions on how to integrate different platforms with your Boldem account:
- Integrating your Shoptet store with Boldem.
- Integrating your Upgates store with Boldem.
- Integrating other websites with Boldem.
Mailing list
For the automation to work correctly, you need a mailing list from which recipients will be loaded into the automation.
You can easily import recipients into your mailing list. The procedure for importing recipients can be found here.
Transactional template
Only so-called transactional templates can be used in automations. Any smart template can be set up as a transactional template. The prerequisite for a successful transactional template is a fully verified sending domain. You can manage the sending domain in Settings/Domains.
You can create a transactional template by following the procedure below. This method also allows you to modify an existing smart template. If you wish to work with an existing template, open it and continue with step 4:
- Log into Boldem and navigate to Templates.
- Click Create a new template and select Create a smart template.
- Choose whether you want to edit a ready-made template from the gallery, start working with a sample template, or start from scratch with a blank template.
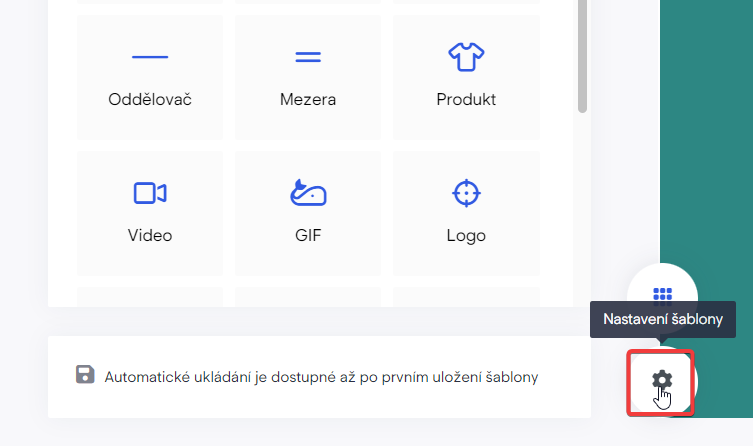
- Click the gear icon. The Information tab appears.
- On the Information tab, fill in the template name, subject, and preheader.
To make it easier to locate your template in the list, we suggest naming it according to the context or scenario in which you intend to use it within your automations.
- Activate the transactional features by toggling on the Template is for transactional emails (automations and API) switch. This action will reveal additional transactional template fields.
- Fill in Sender’s email, Sender’s name, and select your Domain router from the drop-down menu.
Enter a working email address as the sender’s email. This email address must belong to a domain that you have previously verified within Boldem. To add or verify a domain, navigate to Settings/Domains.
- In the upper-right corner, click Done and select Save and leave.
Promo codes
If you decide to motivate your customers to make purchases using promo codes, it is practical to assign a unique promo code to each customer. Before incorporating promo codes into a template, you must enter them into the system either manually or by importing them from a file:
- Go to Settings/Promo codes.
- Click All groups and select Add group.
- Enter the group name, select the group color, and confirm with Add.
- Click New promo code.
- Choose an expiry date in the Select expiry date drop-down menu. The date should match the date you have opted for in the online store, through which promo codes are being generated.
- No expiration – all imported promo codes can be used for unlimited time.
- Single expiry date – there is a set expiry date and time for all imported promo codes. Once selected, a field will appear and further request a date to be specified.
- Individual expiry date – each imported promo code has a defined expiration date and time. To proceed with this option, two columns in the imported file must be filled in: one with the promo codes, and one with the expiry date(and time).
- If you wish to import a file containing promo codes, click Select a file and confirm by clicking Create.
The promo codes file must be in Excel, CSV, or TXT format. There, the codes have to be stored separately on each row. Optionally, the expiry date in the file can be in the format used in your account (see Settings/General/Basic/Settings – Date and time format), or in the default English format mm/dd/yyyy. The expiry date will only be taken into account if you have selected the Individual expiry date option.
- A small number of promo codes can also be imported manually by entering them into the Promo codes field. If this is the choice you opt for, make sure each promo code is written on a separate row. If you also wish to add an expiry date after the promo code, choose Individual expiry date from the Select expiry date drop-down menu and add a semicolon ;, or a vertical bar | after the promo code. Behind this special character, insert the date and time format set in your account (see the note above), e. g.:
PromoCode12|29.3.2028 12:00
- Confirm the dialogue by clicking Create.
Using promo codes in templates
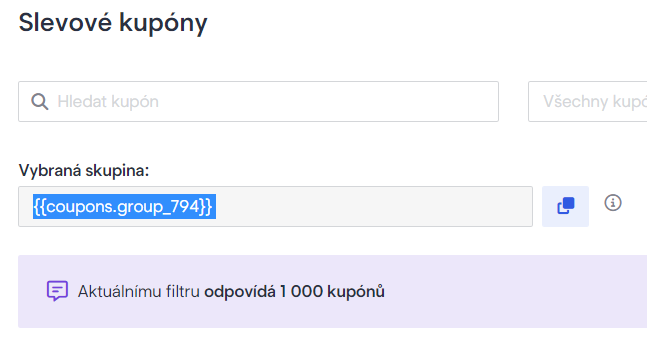
Promo codes can be sorted into groups, each of which can be assigned different colours and names. Every group carries a unique identifier, e.g., {{coupons.group_794}}. Copy and paste the string into the templates you plan to use in campaigns or automations.
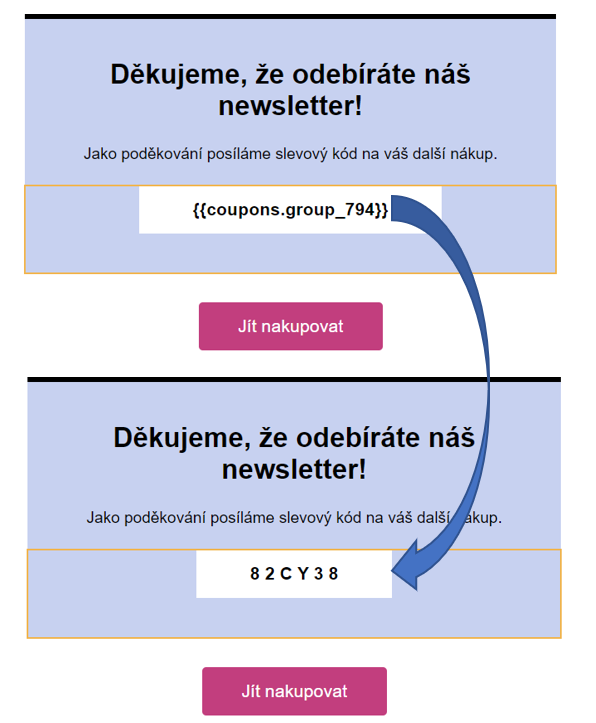
In the template, paste the copied identifier into the area of your liking. After dispatching a campaign, triggering an automation, or dispatching transactional emails, these identifiers will then show as unique promo codes.
Personalized salutation in templates
When creating a template to send to your customers, always consider how the salutation at the beginning will appear to them.
Automatic first name declension
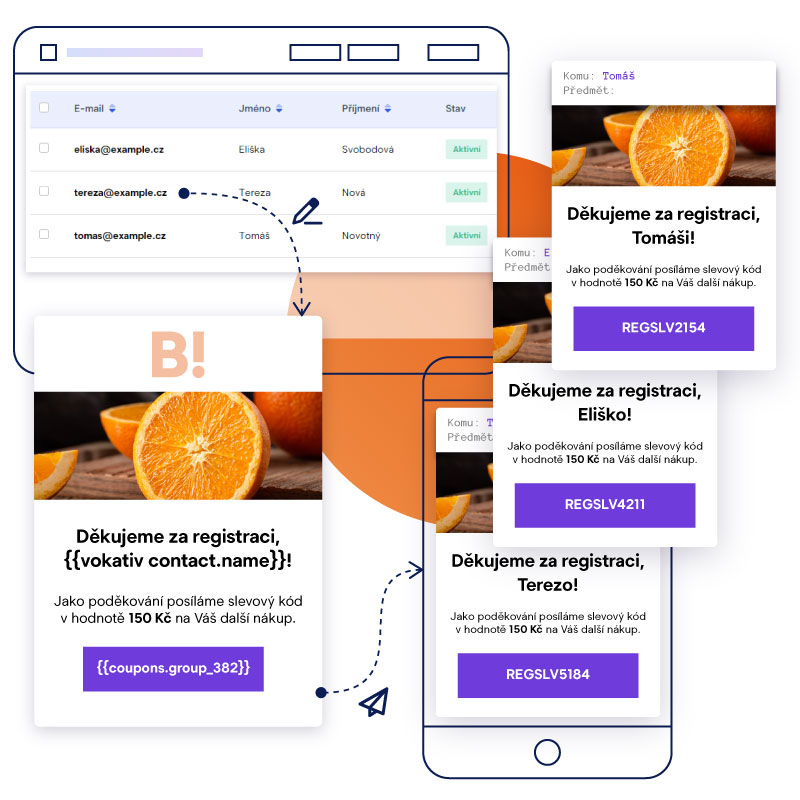
Boldem offers automatic declension of first names into the 5th case – vocative. The variable Vocative is used to generate salutations. Use this variable by inserting the following string into the template:
{{ vokativ contact.name }}
After dispatching the message, this string will be replaced with the recipient’s first name in the correct vocative form. For example, if the recipient’s first name is Jana, the template will display Jano. Alternatively, if you want to choose a more familiar approach with Ahoj Jano (Hi Jana), use the following string:
Ahoj {{ vokativ contact.name }},
For example, if your goal is to express gratitude for registering, use the following string:
Thank you for your registration, {{ vokativ contact.name }}!
Automatic last name declension with gender distinction
In a vast number of personalized salutations, not only do you need to correctly spell both the first and last names, but also to change the salutation to match the person’s gender. Since Boldem allows you to enter the gender of recipients, using the designated variable should make this process a walk in the park.
In certain cases, the gender of the recipients is automatically stored according to the first or last name entered (e.g., when manually inserting recipients or optionally during bulk import). In the case of non-standard names, the gender is not automatically set. Therefore, it is advisable to verify those names first and add the names manually if needed.
If you have set the gender of your recipients, you can use the string below in the template instead of manually addressing recipients:
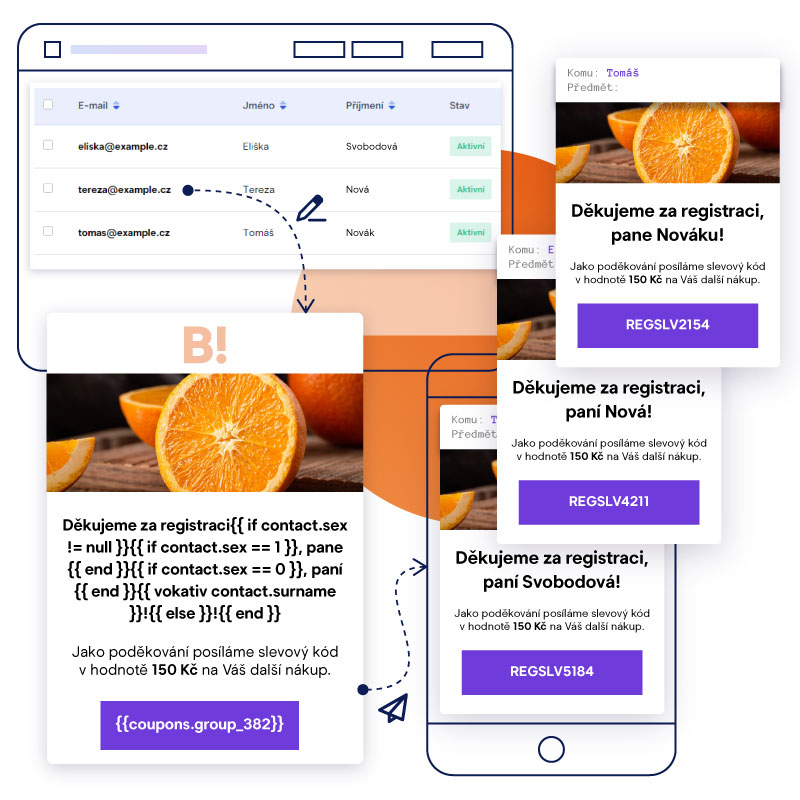
Thank you for your registration {{ if contact.sex != null }}{{ if contact.sex == 1 }}, Mr. {{ end }}{{ if contact.sex == 0 }}, Mrs. {{ end }}{{ vokativ contact.surname }}!{{ else }}!{{ end }}This string is actually a script code that evaluates whether the recipient has the correct gender setting, thus applying the salutation accordingly:
- If the gender is set to Male and the recipient’s last name is Novák, the following salutation will be used: Thank you for your registration, Mr. Novák!
- If the gender is set to Female and the recipient’s last name is Svobodová, the following salutation will be used: Thank you for your registration, Mrs. Svobodová!
- If gender is not set, the following universal salutation will be used: Thank you for your registration!
Naturally, you can modify the text of the salutation (bold text in the example) to your liking. We recommend that you always test the salutation thoroughly on a small sample of test recipients using every possible variation (i.e. with both genders and a recipient without gender).
Automation scenarios
Before creating an automation scenario, define your objectives. Do you want to reactivate customers based on their past activity in your online shop, or based on their response to previous campaigns? There are many possibilities, and you have the freedom to tailor the automation to your preferences. Below, we have selected examples of reactivation automations and their variations that you can set up in Boldem. The following list is by no means complete, and you are free to use your imagination to arrange the various automation blocks in any way that best suits your requirements:
- Reactivating customers who have not made a purchase from your store in a while.
- Reactivating customers who have not responded to your previous campaigns.
Automation scenario – customer reactivation
This automated reactivation campaign will assist you in regaining at least some of your previous customers. It achieves this by sending two consecutive emails with time intervals while implementing conditions that can, e.g., automatically remove recipients who do not respond to either message from your mailing list.
Creating an automation
- Log into your Boldem account and navigate to Automations.
- Click Create new automation.
- Enter the Automation name and description. Both entries are for your reference and can be changed later on the Settings tab in the automation details.
- Confirm your entry by clicking Create automation.
This will open the automation diagram, with an overview of the blocks you can use in the automation on the left and a canvas on the right where you will insert these blocks. To insert a block, simply drag and drop it onto the canvas.
Remember that the automation does not save automatically. Therefore, we strongly recommend that you save your work continuously by clicking Done/Save. You can edit the automation for as long as you need to and it will only activate when you click the Run button.
Automation blocks
First, we need to add a trigger block to specify in which way and how often the recipient will enter the automation. The most common approach is either to trigger the automation repeatedly or just once.
The one-time launch, using the Now block, is for situations where you want to perform a single activation action on a larger group of recipients without any plans to repeat it in the near future.
Conversely, you can configure recurring triggers using the Repeat block at any interval you desire. The block will always involve a condition that specifies for which recipients the automation will be triggered. Opt for this approach if you wish to repeatedly assess recipients who have not engaged with your online shop or with your campaigns in a while.
Below, we will explain the settings for both triggers, but please remember to select and insert only one trigger into your automation!
Starting the automation repeatedly
If you want to run the automation repeatedly, follow these steps:
- Select the Triggers tab on the left, drag the Repeat block onto the canvas, and double-click it to display the block settings.
- From the Mailing list drop-down menu, select the list you want to load the recipients from.
- In the settings, choose how frequently and at what times you want the trigger to repeat.

To configure the block, see setting up the initial condition chapter.
Starting the automation only once
If you want to run the automation only once, follow these steps:
- Select the Triggers tab on the left, drag the Now block onto the canvas, and double-click it to display the block settings.
- From the Mailing list drop-down menu, select the list you want to load the recipients from.
To configure the block, see setting up the initial condition chapter.
Setting up initial condition
Now, you need to select the initial condition in the block to trigger the automation. If you want to check whether the recipient has not made a purchase from your store within a certain period of time, follow these steps:
- Click Select a new condition. A dialog will open to select the condition.
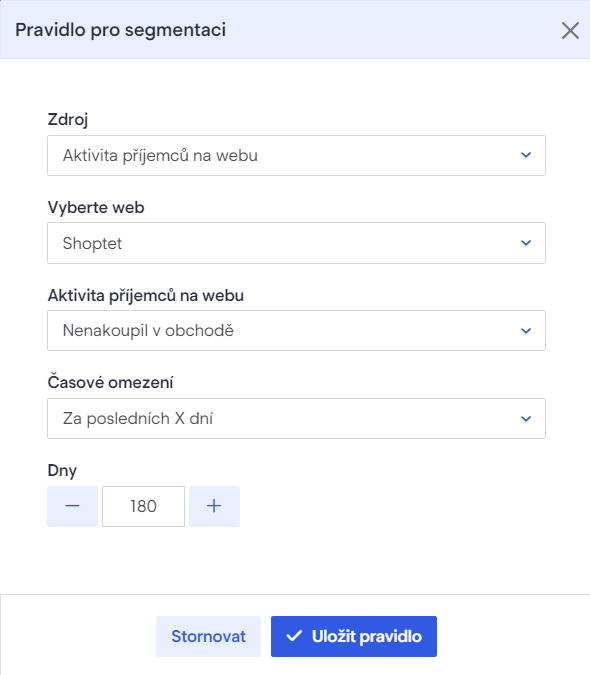
- From the Source drop-down menu select Recipients’ activity on the web.
- In the Select a website drop-down menu, select the previously integrated online shop. If you do not see the online shop in the menu, it may not have been integrated correctly. Verify the status in Settings/Integrations or integrate your online shop with Boldem if you have not already done so.
- From the Recipients’ activity on the web drop-down menu, select Never purchased in store.
- In the Time limit drop-down menu, select the time period after which the condition should be evaluated. For example, select In the last X days and enter the number of days. Enter 180 days if you want to include all recipients that have not made a purchase in the last six months.
- Click Save rule.
- To check which recipients will be included in the automation based on the specified conditions, click Open segmentation.
- If you are satisfied with both the recipients and conditions, click Save and close. Otherwise, modify the condition as needed.
- Click Save to save the entire block.
If you want to evaluate a recipient based on past campaign activity, follow these steps:
- Click Select a new condition. A dialog will open to select the condition.
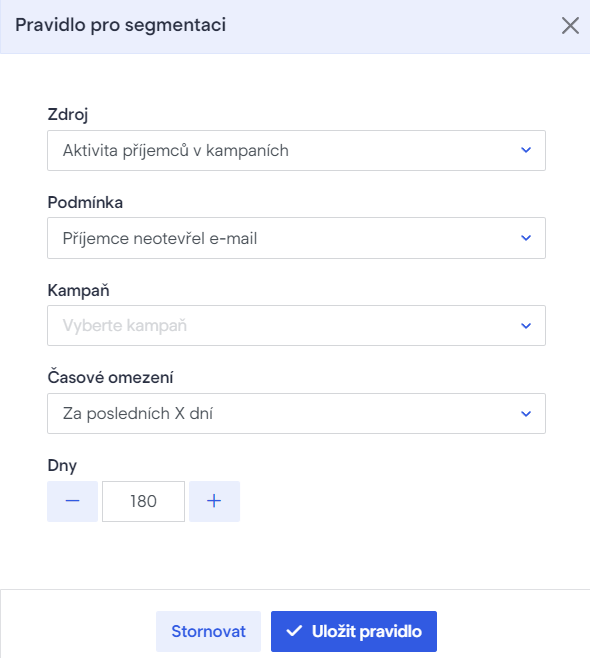
- From the Source drop-down menu select Recipients’ activity in campaigns.
- In the Condition drop-down menu, select the condition according to your needs, e.g., The recipient did not open email.
- In the Campaign drop-down menu, either select a specific campaign or leave the field blank. This way you will include all campaigns.
- In the Time limit drop-down menu, select the time period after which the condition should be evaluated. For example, select In the last X days and enter the number of days. Enter 180 days if you want to include all recipients that have not taken the selected action in the last six months.
- Click Save rule.
- To check which recipients will be included in the automation based on the specified conditions, click Open segmentation.
- If you are satisfied with both the recipients and conditions, click Save and close. Otherwise, modify the condition as needed.
- Click Save to save the entire block.
Sending email
Add a block to send an email that motivates the recipient to become active again. This could be, for example, an offer of a promo code.
- Select the Actions tab on the left, drag the Send email block onto the automation canvas, and double-click it to display the block settings.
- From the Template drop-down menu select the transactional template you want to send to the recipient.
- Leave the other settings as default and click Save.
Inserting delay
After sending an email, it is necessary to set a delay, i.e. the time we allow the recipient to respond to our message.
Procedure to insert the delay:
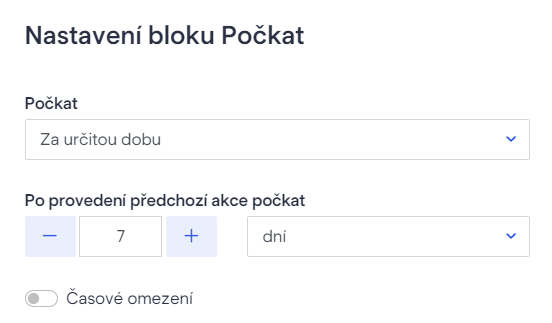
- Select the Operators tab on the left, drag the Wait block onto the automation canvas, and double-click it to display the block settings.
- From the drop-down menu, select Over a period of time and select a delay, e.g., 7 days.
- Click Save.
Adding the first condition block
After the specified delay, you will want to determine whether the recipient has responded to your message. To do this, insert a condition block into the automation. Here is how:
- Select the Operators tab on the left, drag the Condition block onto the automation canvas, and double-click it to display the block settings.
- Click Select a new condition. A dialog will open to select the condition.
- From the Source drop-down menu select Recipients’ activity in transactional emails.
- In the Condition drop-down menu, select the condition according to your needs, e.g., The recipient opened email or The recipient clicked a link in email.
- In the Template drop-down menu, select the transactional template you entered above in the Send emailblock.
- In the Time limit drop-down menu, select the same period of time you entered in the previous Wait block. In our case, 7 days.
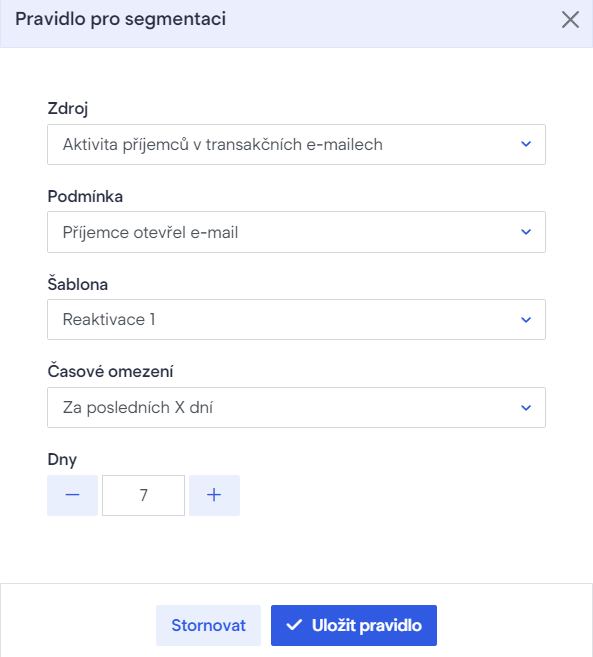
- Click Save rule.
- Click Save to save the entire block.
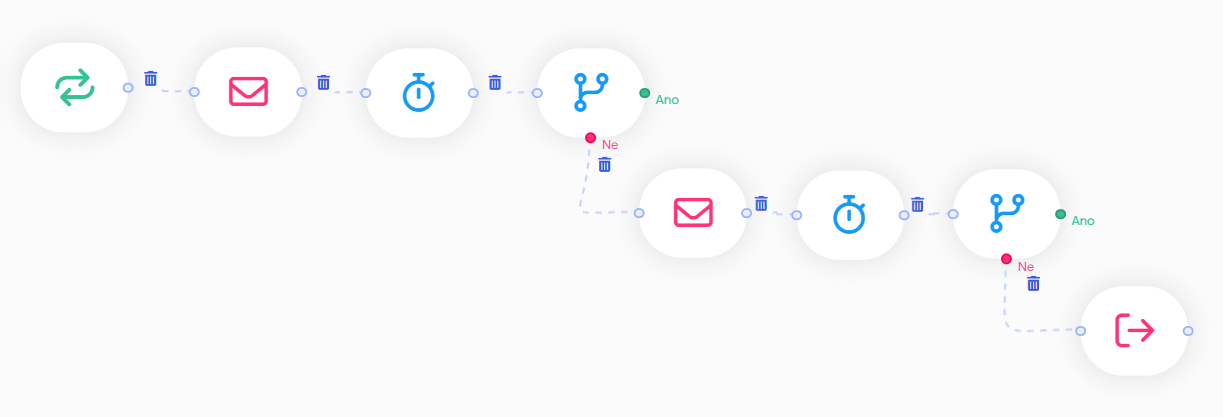
You should now have at least 4 blocks inserted in the automation. Connect the blocks by clicking and dragging the mouse:
You can add extra blocks following the condition block to reflect its evaluation. Proceed accordingly based on which condition branch it is:
First condition block branch – Yes
If the recipient meets the condition you have set, such as opening the reactivation email sent within the last 7 days, you can leave this branch empty if you are satisfied with the result. In this scenario, the automation concludes for the given recipient.
If you want to track recipient activity by a custom indicator, you can create a custom field and assign a value to it using the Edit recipient block. To create and use a custom field, see Custom fields.
Similarly, you can insert recipients into another mailing list if you want to, for example, sort the active recipients. To do this, use the Edit mailing list action.
First condition block branch – No
If the recipient does not meet the condition you have set, e.g., they do not open the reactivation email sent within the last 7 days, you can include additional blocks after this branch to provide the recipient with another opportunity to remain on your mailing list. If the recipient does not respond to this second attempt either, you can add a block with a secondary condition to unsubscribe them entirely.
Adding a block to send an email:
- Select the Actions tab on the left, drag the Send email block onto the automation canvas and double-click it to display the block settings.
- Select the transactional template you want to send to the recipient from the Template drop-down menu.
- Leave the other settings as default and click Save.
Once again, the email should contain some form of motivation. Since the recipient did not respond to the previous message, you can consider offering them alternative incentives. Examples of those include promo codes, a temporary upgrade to a higher discount tier, a club membership, a progressive discount scheme, etc. All depends on the options available to your business.
We must allow the recipient sufficient time to respond to our message. It is advisable to choose a longer delay than in the previous case.
- Select the Operators tab on the left, drag the Wait block onto the automation canvas, and double-click it to display the block settings.
- From the drop-down menu, select Over a period of time and select a delay, e.g., 14 days.
- Click Save.
After the specified time has passed, we re-evaluate the recipient’s response to our message by inserting a second condition block:
- Select the Operators tab on the left, drag the Condition block onto the automation canvas, and double-click it to display the block settings.
- Click Select a new condition. A dialog will open to select the condition.
- From the Source drop-down menu select Recipients’ activity in transactional emails.
- In the Condition drop-down menu, select the condition according to your needs, e.g., The recipient opened email or The recipient clicked a link in email.
- In the Template drop-down menu, select the transactional template you entered above in the Send emailblock.
- In the Time limit drop-down menu, select the same period of time you entered in the previous Wait block. In our case, 14 days.
- Click Save rule.
- Click Save to save the entire block.
Again, we need to re-evaluate the block. See below for details on the individual branches.
Second condition block branch – Yes
If the recipient meets the parameters of our second condition block – that is, they respond to the second email by clicking or opening it within the specified time, we can consider the automation completed. In this case, you can leave the branch empty if you are satisfied with the result.
Just like the first condition block, you can track the recipient’s activity using a custom indicator and create your custom field. You can assign a value to it using the Edit recipient block. For instance, you can differentiate the level of activity based on which message the recipient responded to. If you offer different types of incentives in each message, you can name the activity type according to those incentives and assign them to recipients. Over time, you can review these data to evaluate which incentive is more effective in re-engaging inactive customers.
To create and use a custom field, see Custom fields.
Similarly, you can insert recipients into another mailing list if you want to, for example, sort the active recipients. To do this, use the Edit mailing list action.
Second condition block branch – No
If the recipient does not meet the condition you have set, such as not even opening the second reactivation email sent within the last 14 days, you can insert a block after this branch to completely unsubscribe the recipient from your mailing list.
- Select the Actions tab on the left, drag the Unsubscribe block onto the automation canvas, and double-click it to display the block settings.
- In the Unsubscribe mode drop-down menu select how you want to unsubscribe the recipient:
- Global – this will permanently remove the recipient from all mailing lists in your account.
- Unsubscribed from a mailing list – if you want to remove the recipient only from a specific mailing list, select this option and choose the list from the drop-down menu.
- Optionally, you can unsubscribe the recipient only for a certain period of time. In this case, toggle on the Time limit switch.
- Click Save.
Testing and starting automation
You should now have at least 8 blocks inserted in the automation. Connect the blocks by clicking and dragging the mouse:
You can further customize the automation according to your preferences, e.g., change the number/types of emails and the delays over time to test what works best for your customers.
Once you are satisfied with the settings and number of blocks, save the automation by clicking Done/Save.
Test the automation thoroughly before starting! You can find the testing procedures in the Testing automation article. We recommend not to underestimate testing and to start the automation only after properly trying it out.
Once you have completed the testing with a positive result, run the automation by clicking Run.
For general information on how to work with automations, see Working with automations in Boldem.